Building Custom Apps
The NC.js package provides a baseline that a web programmer can extend for your own local needs. Typically, an app will have some new capability provided by the server and matching UI elements in the client to present or control it.
The existing NC.js source code contains a sample application that you can use as a starting point for your own code. This sample searches through a digital thread model for alternative workplans, groups them by name, and presents them as buttons for switching between the options. We will walk through the server and client code to do this in the sections below.
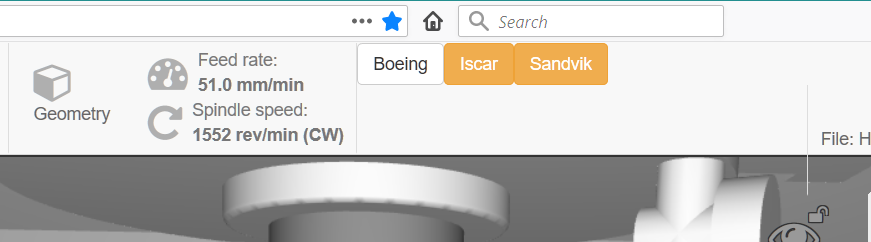
The "Moldy" model has Profile and Pocketing alternatives named
Boeing, Iscar, and Sandvik. The model starts with a mix - the Sandvik
plan is selected for profiling and the Iscar plan for pocketing.
These partial configs are shown in yellow. Clicking on one of them
will select that for both operations and hilight the button in blue.

To make this happen, we implement a new custom REST endpoint, at
/v3/custom/config that finds the current configuration,
or sets it if given an argument. The endpoint returns a JSON object
with an array of all configs, and the name of the selected one. We
also inplement an event, called "custom:config", that gets sent to all
connected clients when the config is changed. This keeps all of the
clients in sync if more than one is looking at the server.
GET http://localhost:8080/v3/custom/config
{
  "configs":["Boeing","Iscar","Sandvik"],
  "selected":"Sandvik"
  or "partial": [ list of configs ] if a mix
}

Change the config to Boeing
GET http://localhost:8080/v3/custom/config/Boeing
{
  "configs":["Boeing","Iscar","Sandvik"],
  "selected":"Boeing"
}
Running the Custom Application
The code for the custom configuration app is included with the
NC.js source but is /* block commented */ out. To try
this sample app, search for and uncomment all code marked with the
string "CUSTOM-APP" in the following files, then rebuild
with npm run make.
NC.js/src/client/views/header/index.jsxNC.js/src/client/views/responsive/index.jsxNC.js/src/server/api/v3/custom.js
Custom Server Endpoints
The existing server endpoints cover a
variety of information and behavior. When your App needs something
beyond these for its new capability, add your own REST endpoints under
the /v3/custom prefix. In our sample, we add the
/v3/custom/config endpoint.
The source for the new endpoint
in NC.js/src/server/api/v3/custom.js. The server
endpoints are implemented as javascript functions that use the Finder,
Tolerance, APT, and Adaptive parts of
the STEP-NC
API to get detailed information from the digital thread model.
You can prototype the interesting parts of your endpoints as plain
node programs. When you move the code into the server, you will get
the parameters as part of the request URL and return JSON object to
the client along with a status code.
The module exports at the end of the file connects the REST
endpoints with javascript functions
using Express.js. Here,
the _getConfig() function is always called for an HTTP
GET on the the base config endpoint and the one that is
followed by a name parameter. The Express.js docs have
more about
parameters and endpoint routing.
The NC.js/src/server/api_server.js file will call this
exported function for custom.js and the other server
source files. If you put your endpoints in a new source file, be sure
to add it to the chained calls
in APIServer.prototype._setRoutes.
module.exports = function(globalApp, cb) {
  app = globalApp;
  app.router.get('/v3/custom/config',       _getConfig);
  app.router.get('/v3/custom/config/:name', _getConfig);
  if (cb) { cb(); }
}
The _getConfig() function computes the existing config
if it is not yet known, checks whether it has been called with the
"name" parameter, and either returns the config or changes to the
requested one and returns the updated config. When it changes the
config, it also sends an event named "custom:config" via the
websockets that all clients listen on. The event includes the new
config as an argument.
var cfg = {};

function _getConfig(req,res) {
  // find existing config
  if (cfg.configs === undefined) {
    cfg = _findConfig();
  }

  if ((req.params.name !== undefined) &&
      (cfg.configs.includes(req.params.name))) {
    // change config, send new, issue event
    cfg = _setConfig(req.params.name);
    res.status(200).send(cfg);
    app.ioServer.emit('custom:config', cfg);
  } else {
    // send existing config
    res.status(200).send(cfg);
  }
}
Finding the config is just a simple traversal using STEP-NC API code. This was prototyped as simple node programs and then dropped into the server. The Adaptive object walks the process, looking at all executables, even those that are disabled. It stops at each exec that is an element of a Selective (the STEP-NC process element that holds alternatives), then adds the ID and enabled/disabled state to a dictionary, grouped by name.
function _findConfig() {
  let ctl = new StepNC.Adaptive();

  // Look at the elements of all selectives.  Group by name
  ctl.SetVisitAllExecs(true);
  ctl.SetWantedAll(false);
  ctl.SetWanted(StepNC.CtlEvent.EXEC_SELECT_NEXT);
  ctl.StartProject();

  let execs = {};
  while (ctl.Next()) {
    let id = ctl.GetActiveExec();
    let nm = file.find.GetExecutableName(id);

    if (execs[nm] === undefined) {
      execs[nm] = [];
    }
    execs[nm].push({'id': id, 'active': file.find.IsEnabled(id) });
  }
At the end, the configs are the unique names from the dictionary. We also compute a list of configs that have at least one executable enabled and the subset that have all of their executables enabled. If we only have one for both, that is the selected config, otherwise we return the list of partials.
  let ret = {
    "configs": Object.keys(execs).sort()
  };
  // look for configs that have some enabled WSs enabled and ones that
  // have everything enabled.  Selected if both lists have one entry.

  let partial = ret.configs.filter(
    nm => execs[nm].find(elem => elem.active)
  ).sort();

  let selected = partial.filter(
    nm => execs[nm].every(elem => elem.active)
  );

  if ((partial.length === 1) && (selected.length === 1)) {
    ret.selected = selected[0];
  } else if (partial.length > 0) {
    ret.partial = partial;
  }
  return ret;
}
The _setConfig() also loops over all selectives with
using the Adaptive class. In this case it just adjusts the enabled
flag of each element depending on whether its name matches a given
value.
Custom Client UI
The client UI is implemented as a collection
of React.js components. These can
be found under the NC.js/src/client/views directory. The
responsive view is the root component and acts as the clearinghouse
for data on the client. It maintains state information and dispatches
the notification events recieved via the websocket that the client
sets up with the server. We also modify the header view to display
the configuration as a series of buttons. These two files are:
NC.js/src/client/views/header/index.jsxNC.js/src/client/views/responsive/index.jsx
When writing client javascript, you automatically have access to
all of the plugins listed below, at the given symbol. The most current
list can be found in the webpack.config.js file listed
under the "plugins" tag.
React- react_(underscore) - lodash$(dollar sign) - jqueryjQuery- jqueryBackbone- backboneTHREE- threeFileSaver- file-saverrequest- superagentReactDOM- react-domio- socket.io-client
Responsive View
In the constructor(), we add a custom entry to the state object for our application. React will track which UI subcomponents use each state variable, and when a state variable changes, it will force that component to re-render to show the new information.
this.state = {
  [ ... other variables ... ]
  // CUSTOM APP STATE - for sample application that changes the
  // workplan between several predefined configs.
  custom_config: null
};
We add a getCustomConfig() function to parse the JSON
sent back from our custom REST endpoint and update the state variable
if needed. There is also an entry in the addBindings()
function to give our config function access to the state variable.
In addListeners(), we watch for an event and update
the client data as needed. This is the notification from the server
to all connected clients when the workplan has changed. This code
updates the client state for the workplan, which updates any UI
elements that use it.
this.props.app.socket.on('custom:config', (cfg)=>{
  let old_cfg = this.state.custom_config;

  if ((old_cfg === null) ||
      (old_cfg.selected !== cfg.selected)) {
    this.setState({'custom_config' : cfg});
  }

  // request new workplan and tool data if config changed
  if ((old_cfg !== null) &&
      (old_cfg.selected !== cfg.selected)) {
    request.get('/v3/nc/workplan/')
      .then(this.getWorkPlan)
      .then(()=>{
	// get the cache of tools, need workplan first
	return request.get('/v3/nc/tools/');
      }).then(this.getToolCache);
  }
});
In componentWillMount() which is called when the
client first loads, we request the config from the server using our
custom REST endpoint, and set our state variable using
the getCustomConfig() function.
// CUSTOM-APP - Get available configs at startup
request.get('/v3/custom/config').then(this.getCustomConfig);
Finally, in the render() function, we pass the config
state variable to the HeaderView component, which will show it on the
screen and possibly call the REST endpoints to change configs. This
is discussed in the next section.
<HeaderView
  [ ... many other variable assignments ... ]

  // CUSTOM-APP - Pass config to header object
  cfg = {this.state.custom_config}
/>
Header View
In the header/index.jsx file, we define a new class to
display the configuration menu. In the render() function
for this class, we generate a DIV with a button for each name in the
configuration array.
The color of the button is deternined by
the configstyle() function, which returns a different CSS
style depending on whether it is the selected, partially selected, or
unselected configuration.
Finally, the click event is handled by the cfgClick()
function which calls the custom REST endpoint with the new config
name.
class ConfigMenu extends React.Component {
  constructor(props) {
    super(props);
    this.cfgClick = this.cfgClick.bind(this);
  }

  cfgClick(nm){
    request.get('/v3/custom/config/'+nm).end();
  }
  render() {
    let cfg = this.props.cfg;
    if (cfg === undefined) { cfg = { configs: [] }; }

    return (
	<div>
      {cfg.configs.map(nm => (
	  <div className={configstyle(cfg,nm)}
	     onClick={() => {this.cfgClick(nm);}}>{nm}</div>
      ))}
      </div>
    );
  }
}
Finally, in the render() function of the HeaderView
class, we use the ConfigMenu element and pass in the parameters that
it needs to display.
// CUSTOM-APP - Add config menu to header
<ConfigMenu cfg={this.props.cfg} actionManager={this.props.actionManager}/>